banner
Hi my new friend!

如何通过Microsoft OAuth获取账户信息

Scroll down

前言

虽然之前也在网上找到过如何进行Microsoft OAuth,但是感觉不太清楚,甚至最近有应用需要使用时被网上的教程误导。于是自己写一下,希望对你有用.

本篇笔记将用python进行api请求的演示,同时也会给出相应请求的格式示例,方便理解

请求进度只会写到获取到账户唯一凭证,且应用类型为Web应用(重定向url为https://example.com/auth 的类型),不是设备码登录,不会深入到Xbox等信息。不过对于大多数只是让自己应用支持使用Microsoft账户登录也足够了

INFO

本文内容及代码纯手写,无AI参与,请放心食用。如有错误,欢迎指正

准备工作

首先,你需要自行注册一个Microsoft账号,各位应该都有,这里就不多说了

注册应用

然后前往Azure Portal进行应用创建

登录之后的样子应该是这样的:
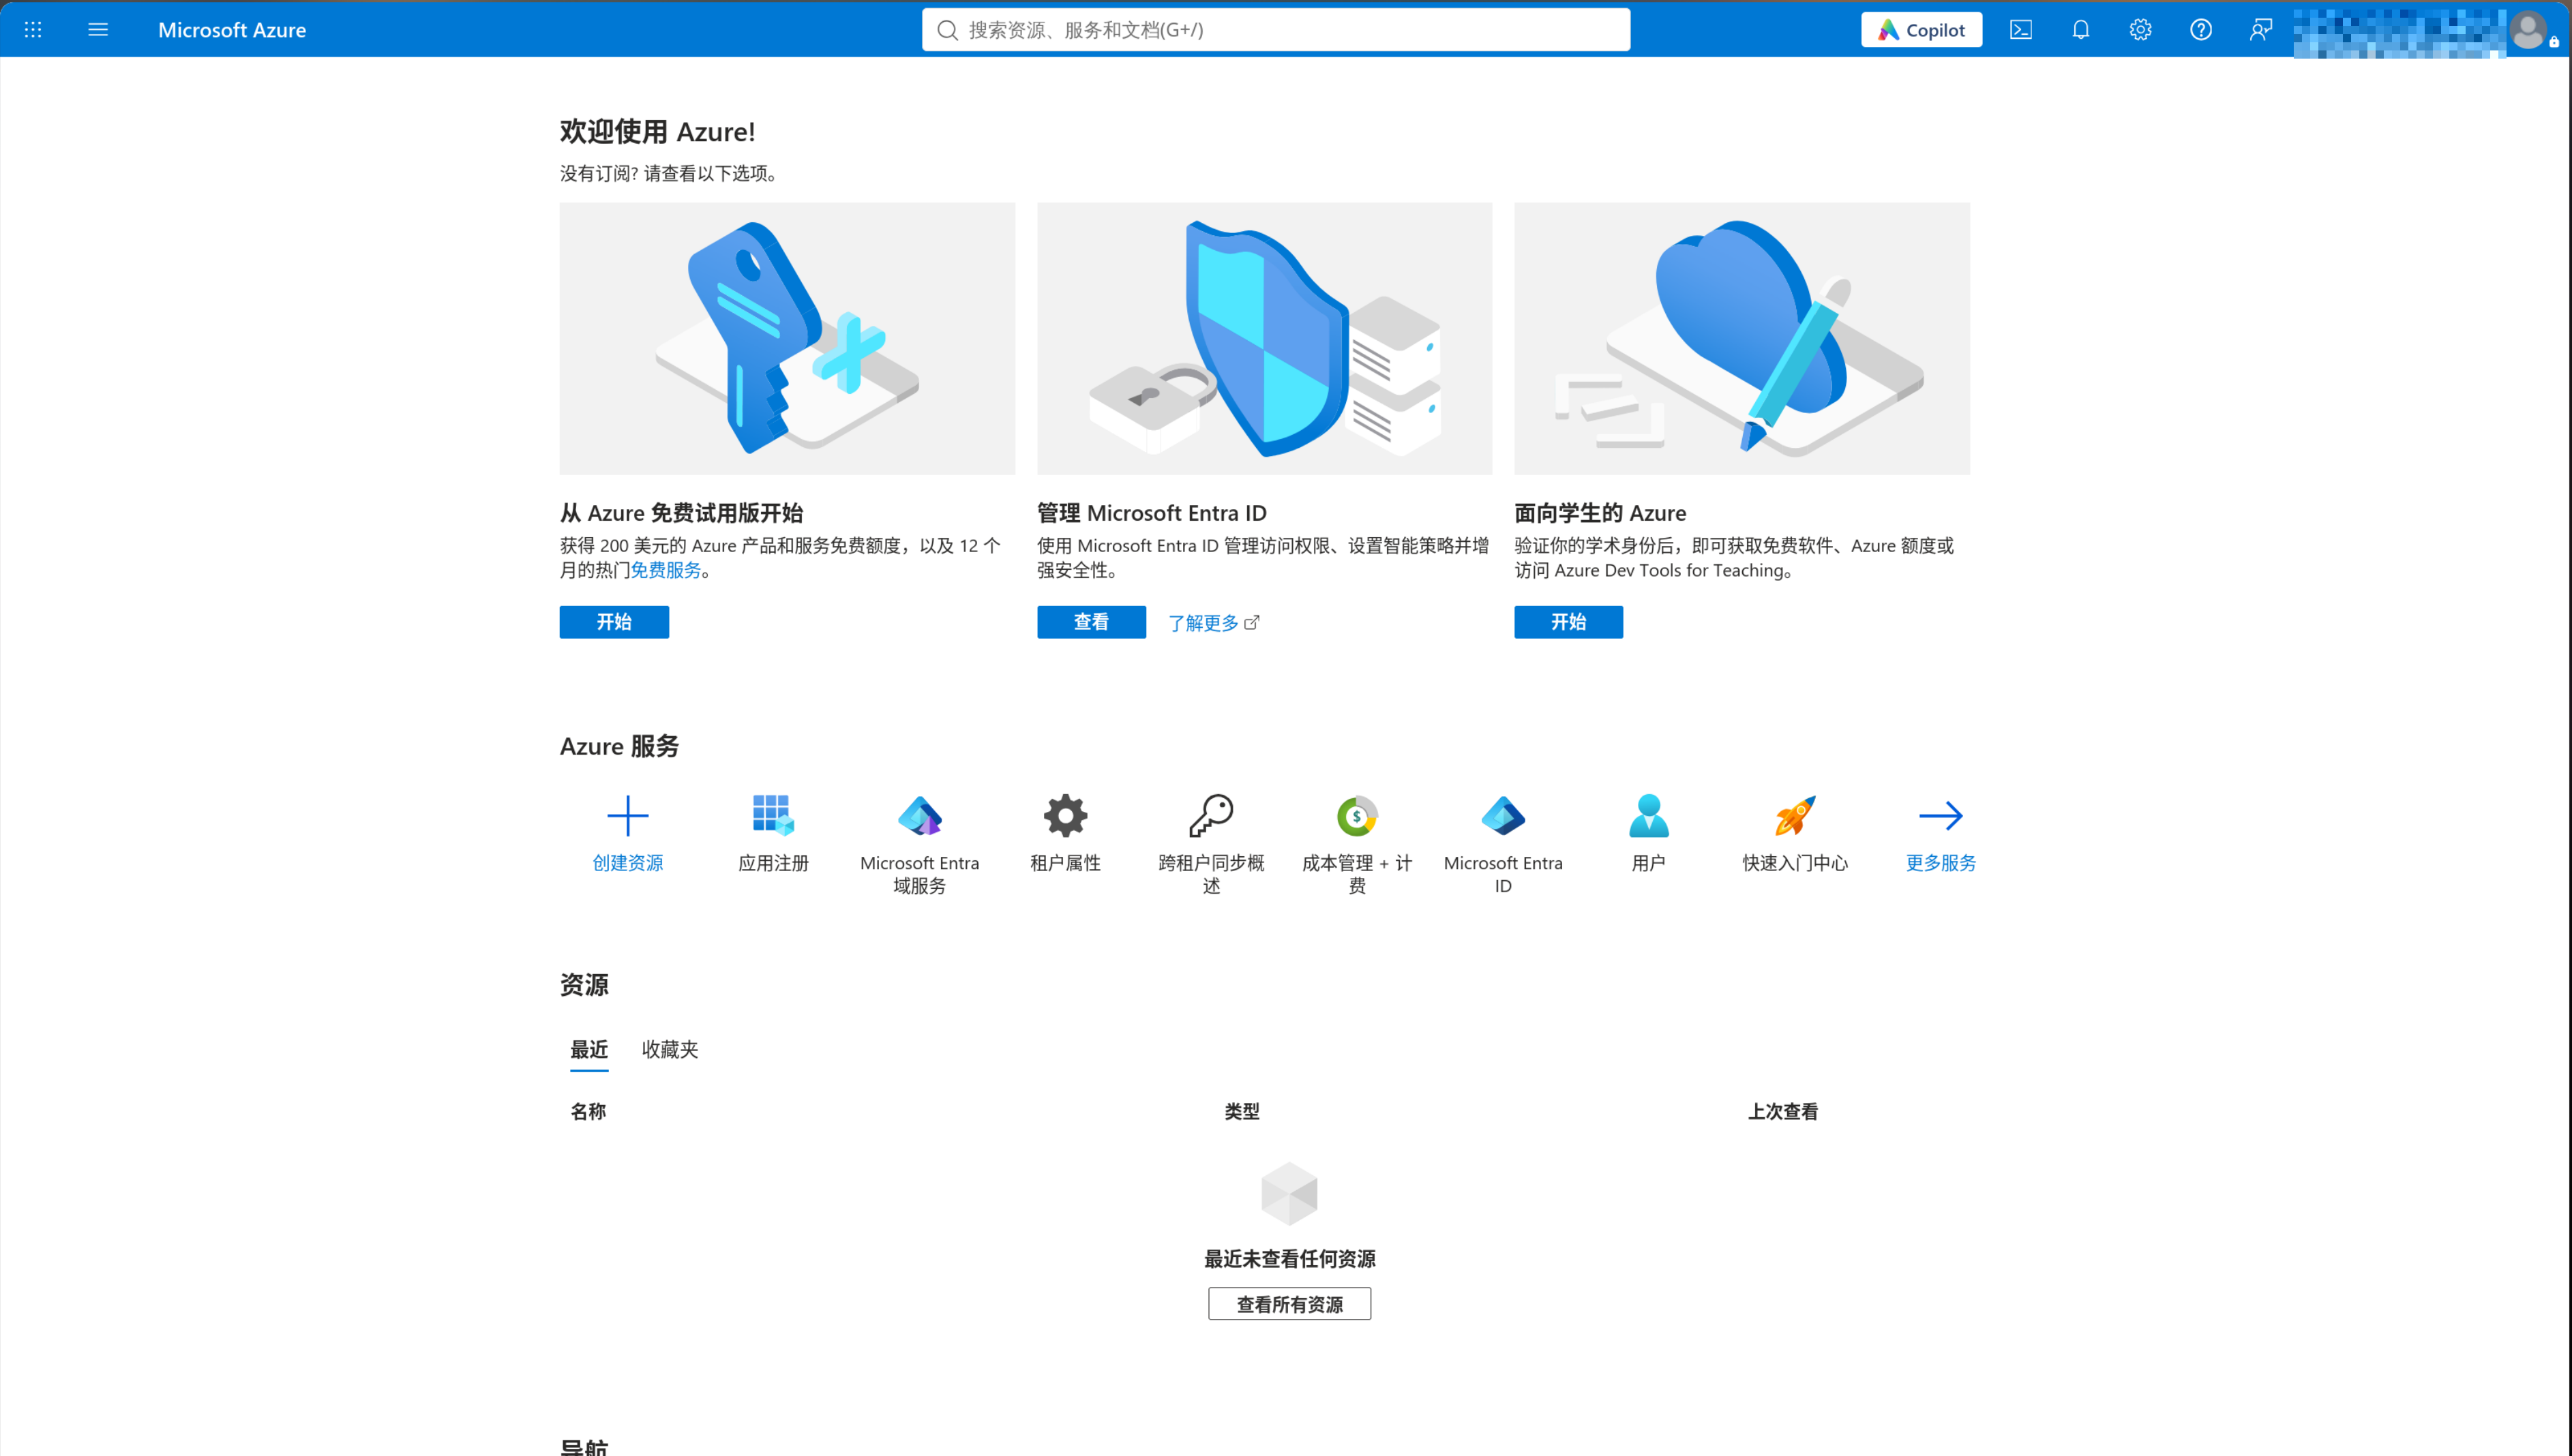
Auzre Portal Home

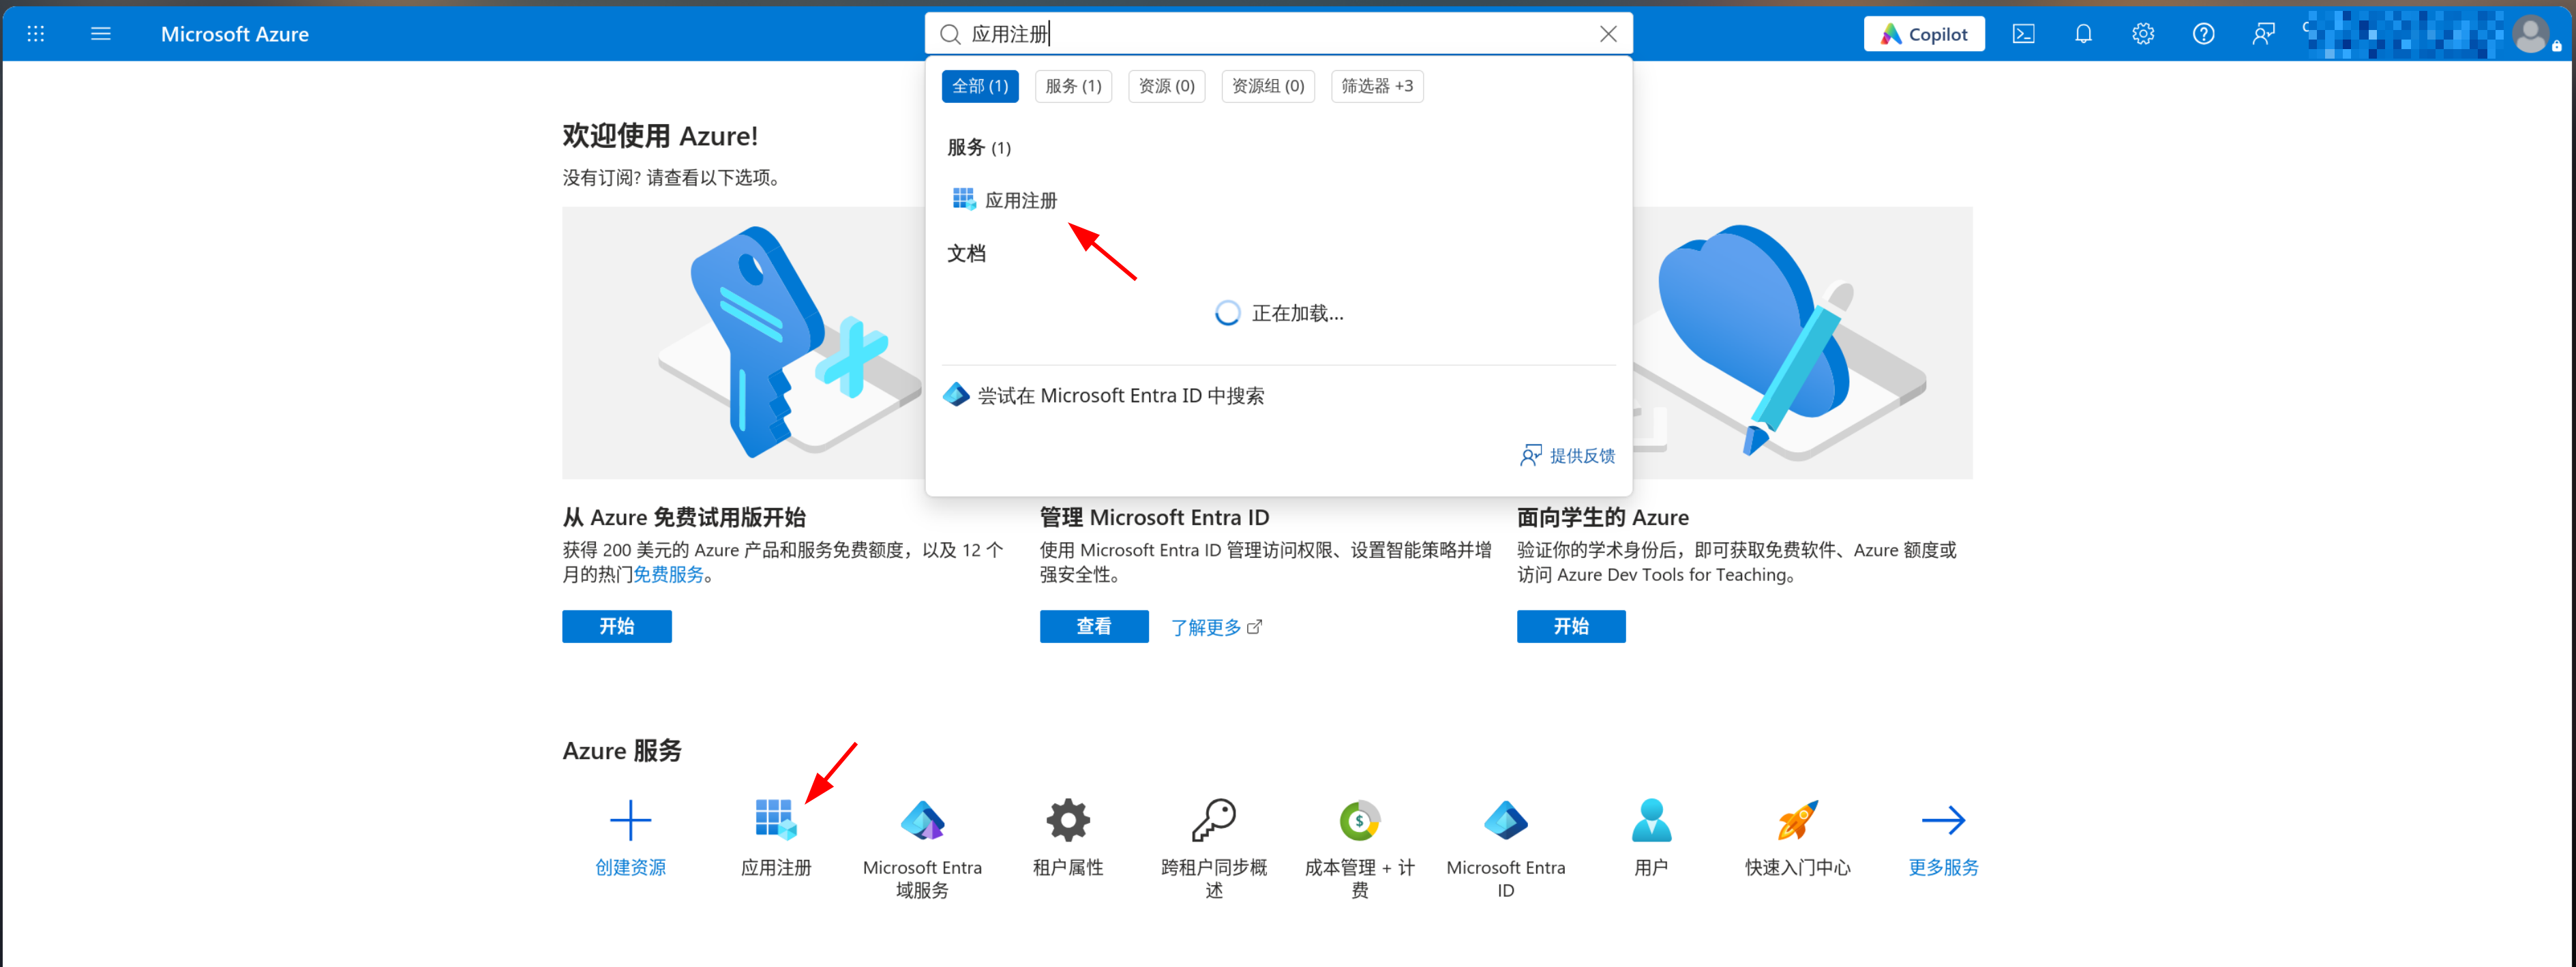
然后直接点击应用注册或者在上方搜索栏搜索应用注册
Azure Search App Register

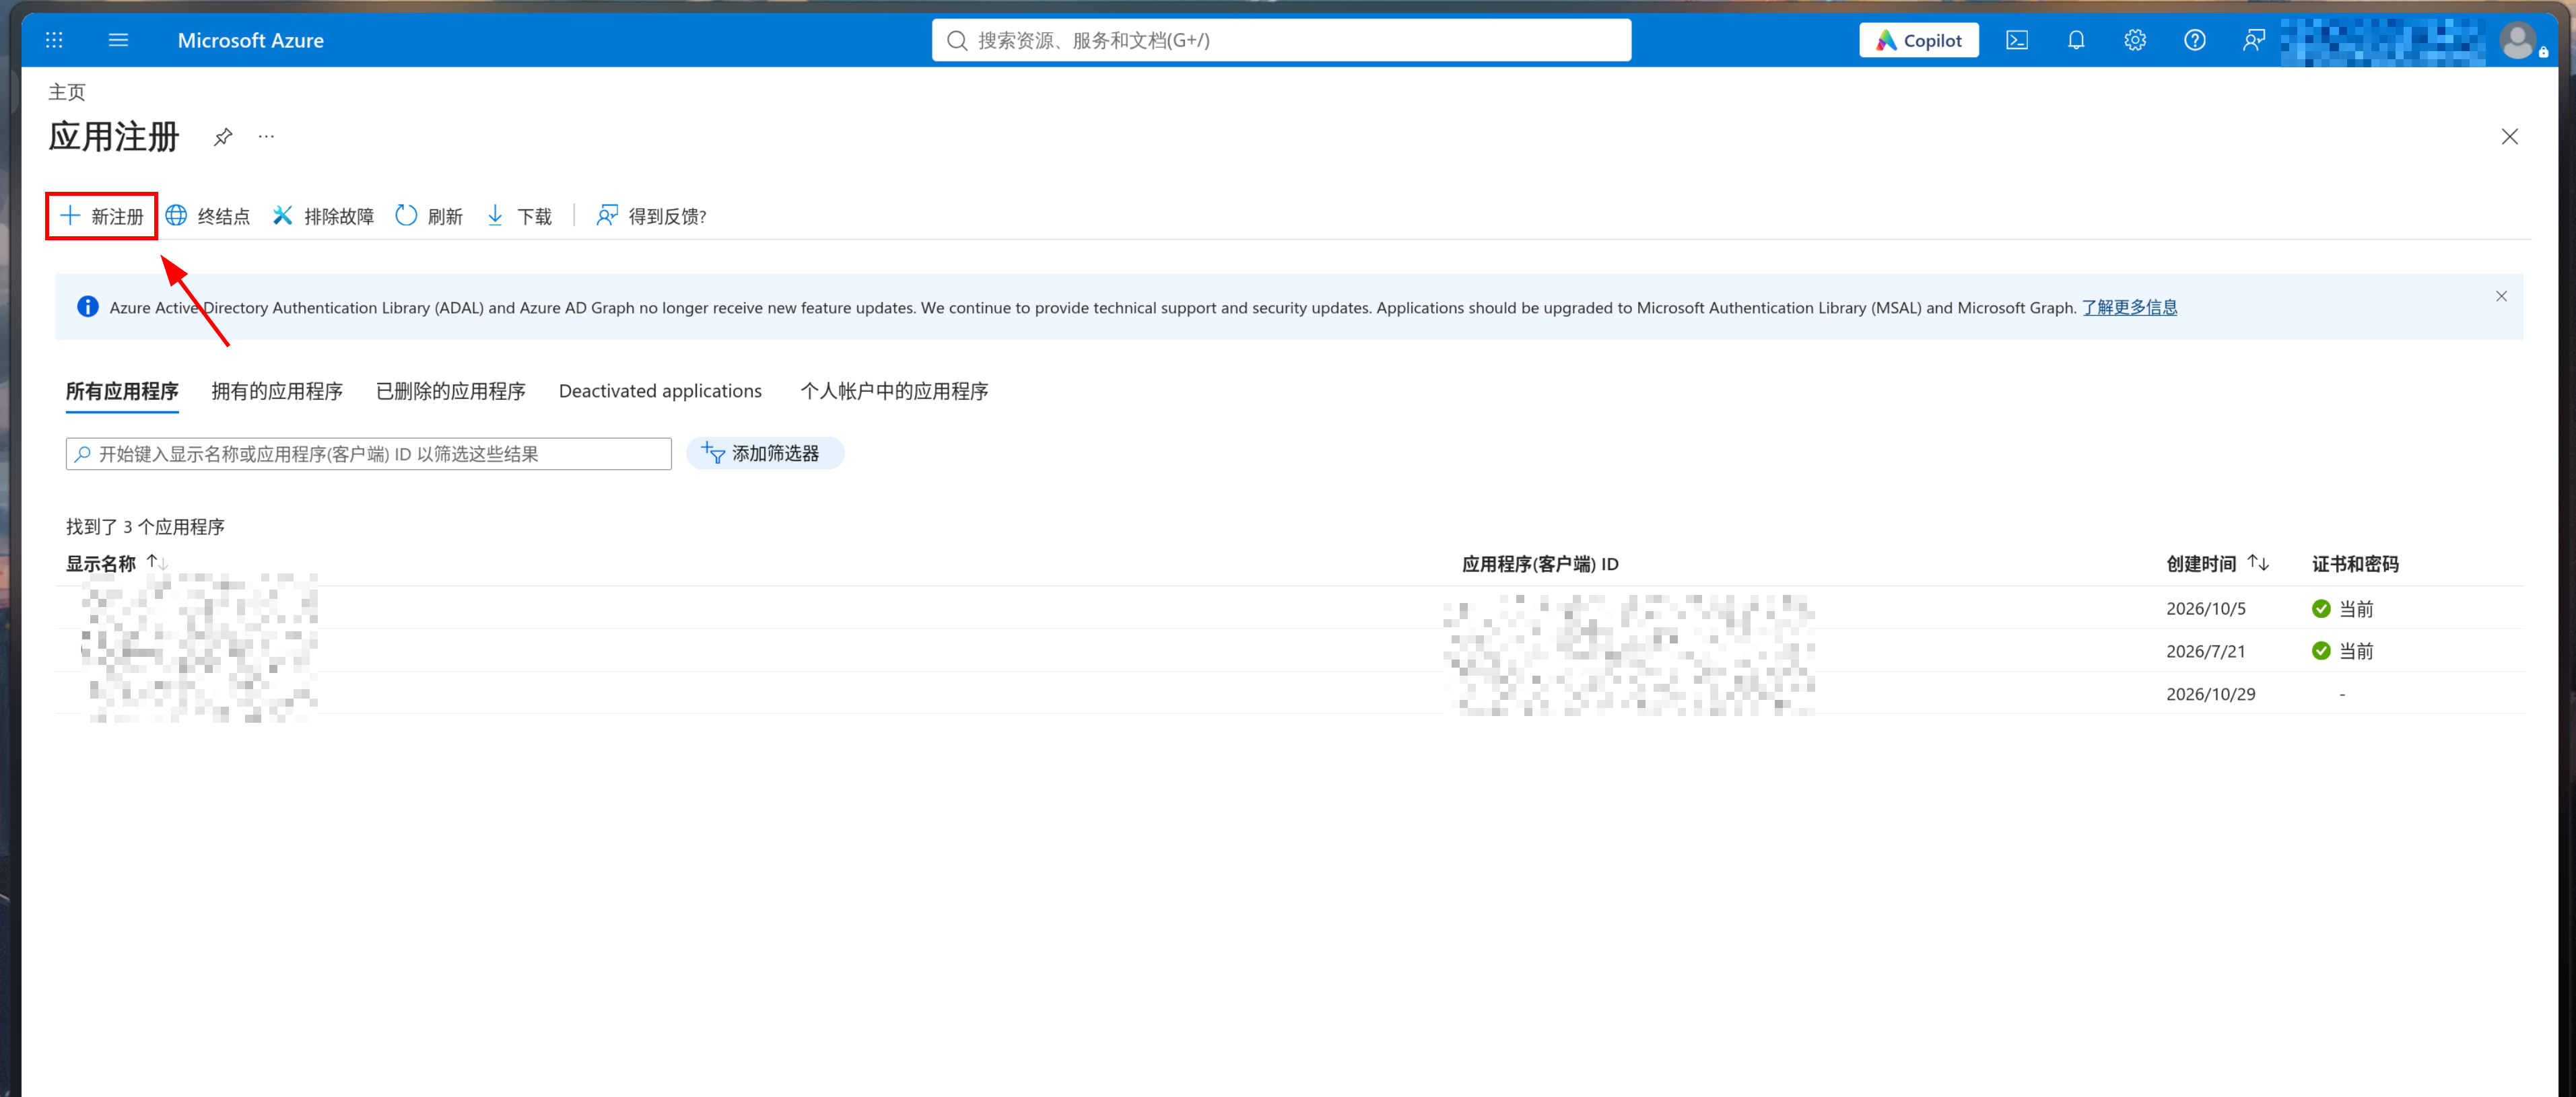
然后点击新注册
Azure App Home

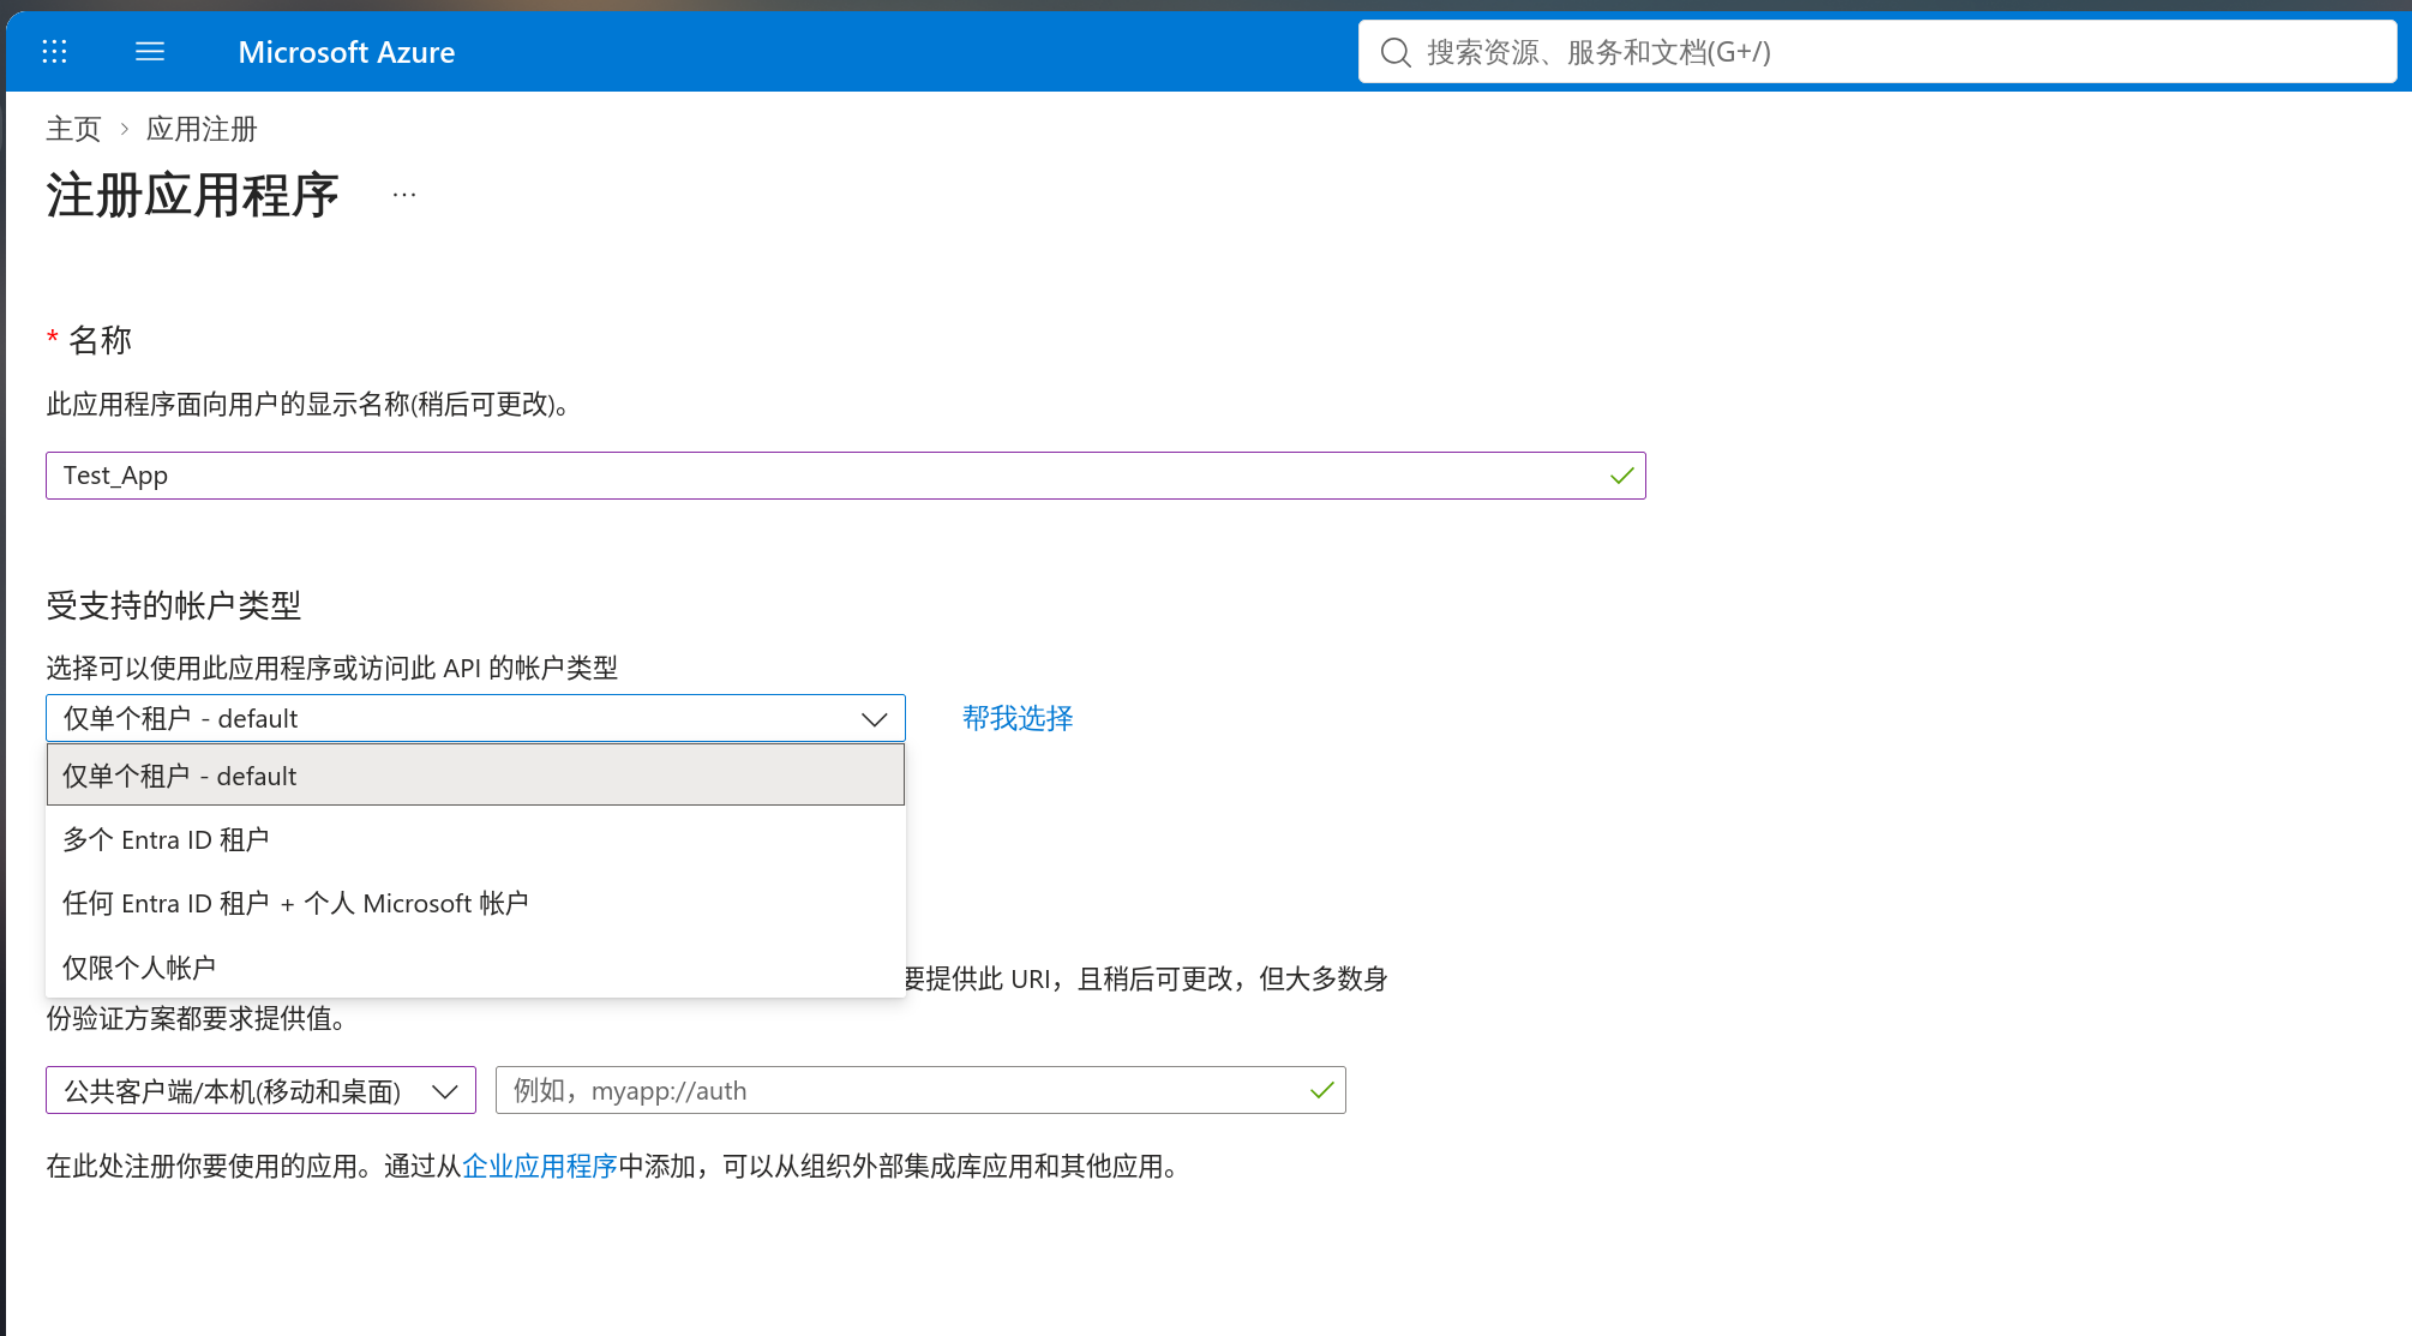
然后按照自己的App信息进行填写
Azure App Info

敲黑板,这里受支持账户类型分为如下几种:

  • 仅单个租户
  • 多个 Entra ID 租户
  • 任何 Entra ID 租户 + 个人 Microsoft 账户
  • 仅限个人账户

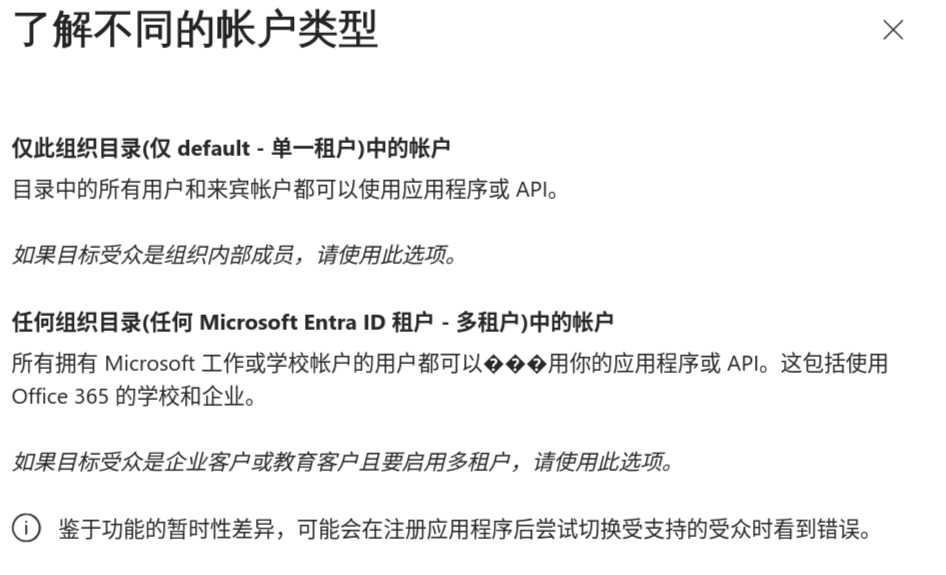
如下为Azure的简单描述
Dfference of azure account type

其中的区别主要为允许登录的账户(与账户类型)以及oauth端点前缀

  • 仅单个租户/多个 Entra ID 租户: https://login.microsoftonline.com/{目录(租户) ID}/
  • 任何 Entra ID 租户 + 个人 Microsoft 帐户: https://login.microsoftonline.com/common/或https://login.microsoftonline.com/{目录(租户) ID}/
  • 仅限个人账户: https://login.microsoftonline.com/consumers/
INFO

{目录(租户) ID}只是占位符,你需要更改为自己的ID, 如327bxxxx-xxxx-xxxx-xxxx-xxxxxxxxxxxx

如果手滑选错了支持的账户类型,还可以在Authentication (Preview) - Supported accounts中进行更改

下方重定向 URI (可选)选择Web并按需填写应用oauth的重定向处理路径,方便演示,这边全部写为http://localhost:8080

然后点击注册,我们的应用就注册好了
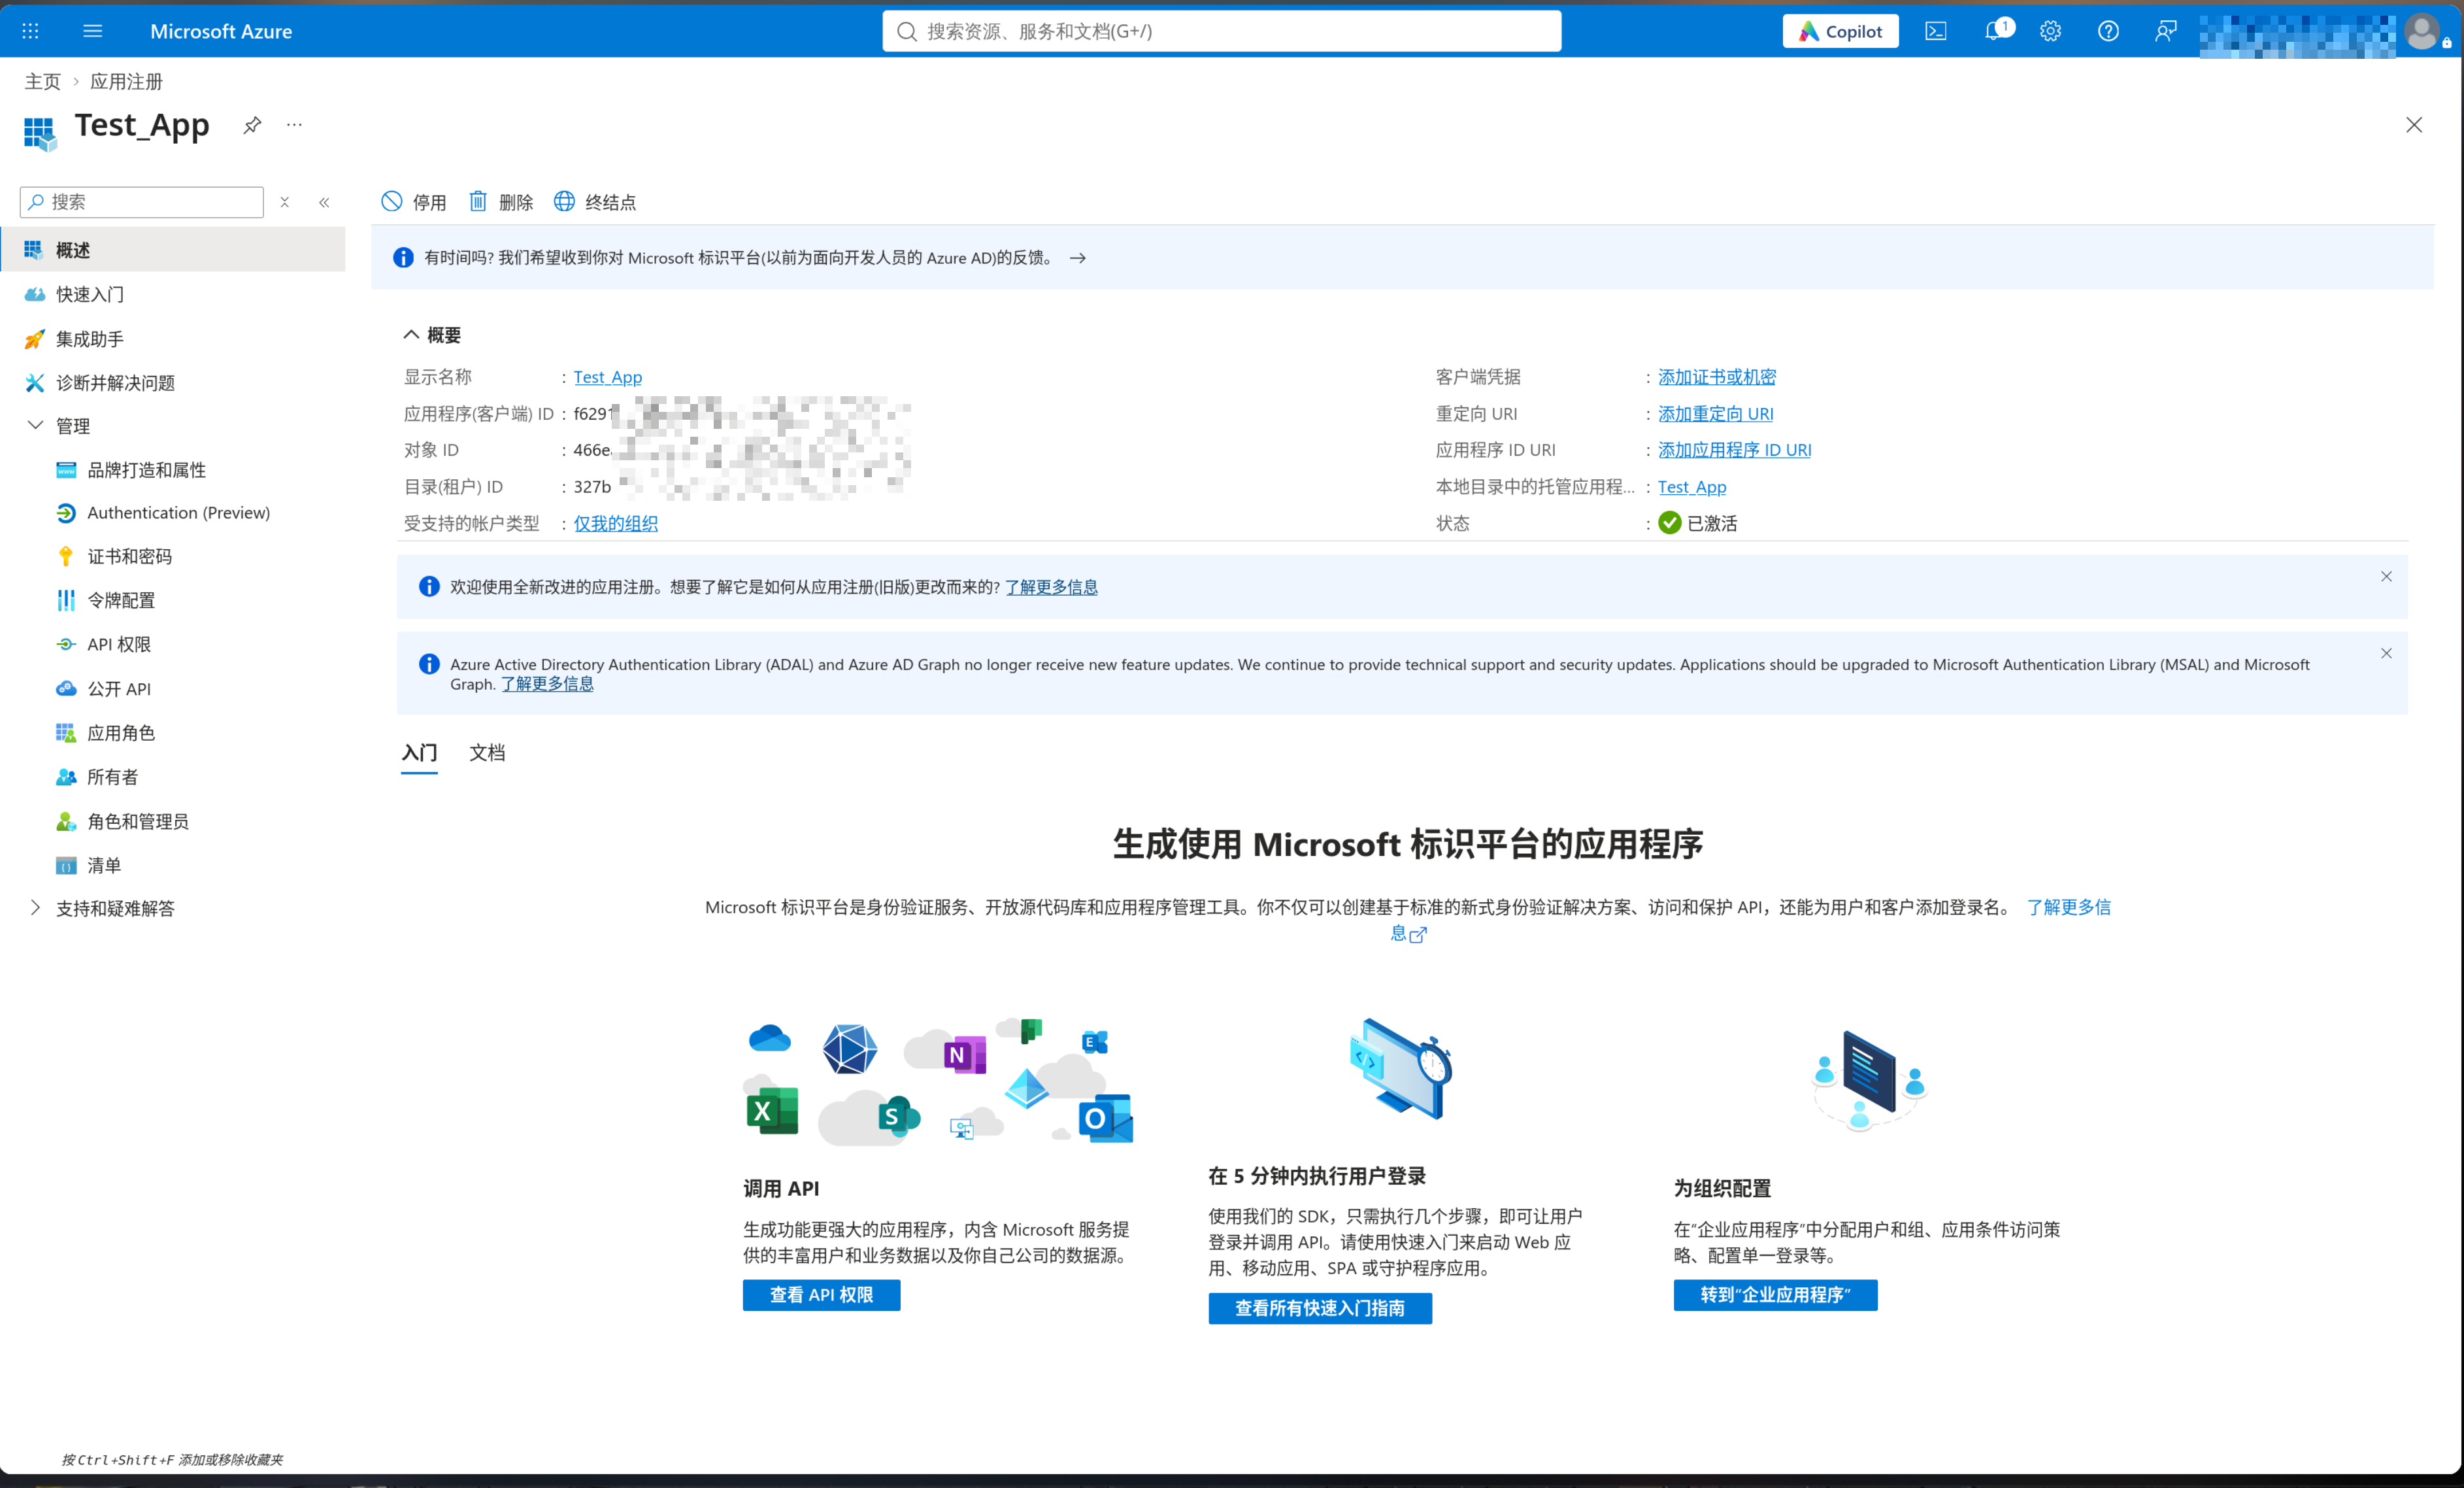
Azure Test_App Home

然后复制应用程序(客户端) ID, 目录(租户) ID备用

选择了错误的账户类型

如果你选择了错误的账户类型,且无法在Authentication (Preview) - Supported accounts进行更改,并伴随如下错误

Azure can't change supported account type

那么你需要到清单页面,并将api.requestedAccessTokenVersion的值改为2
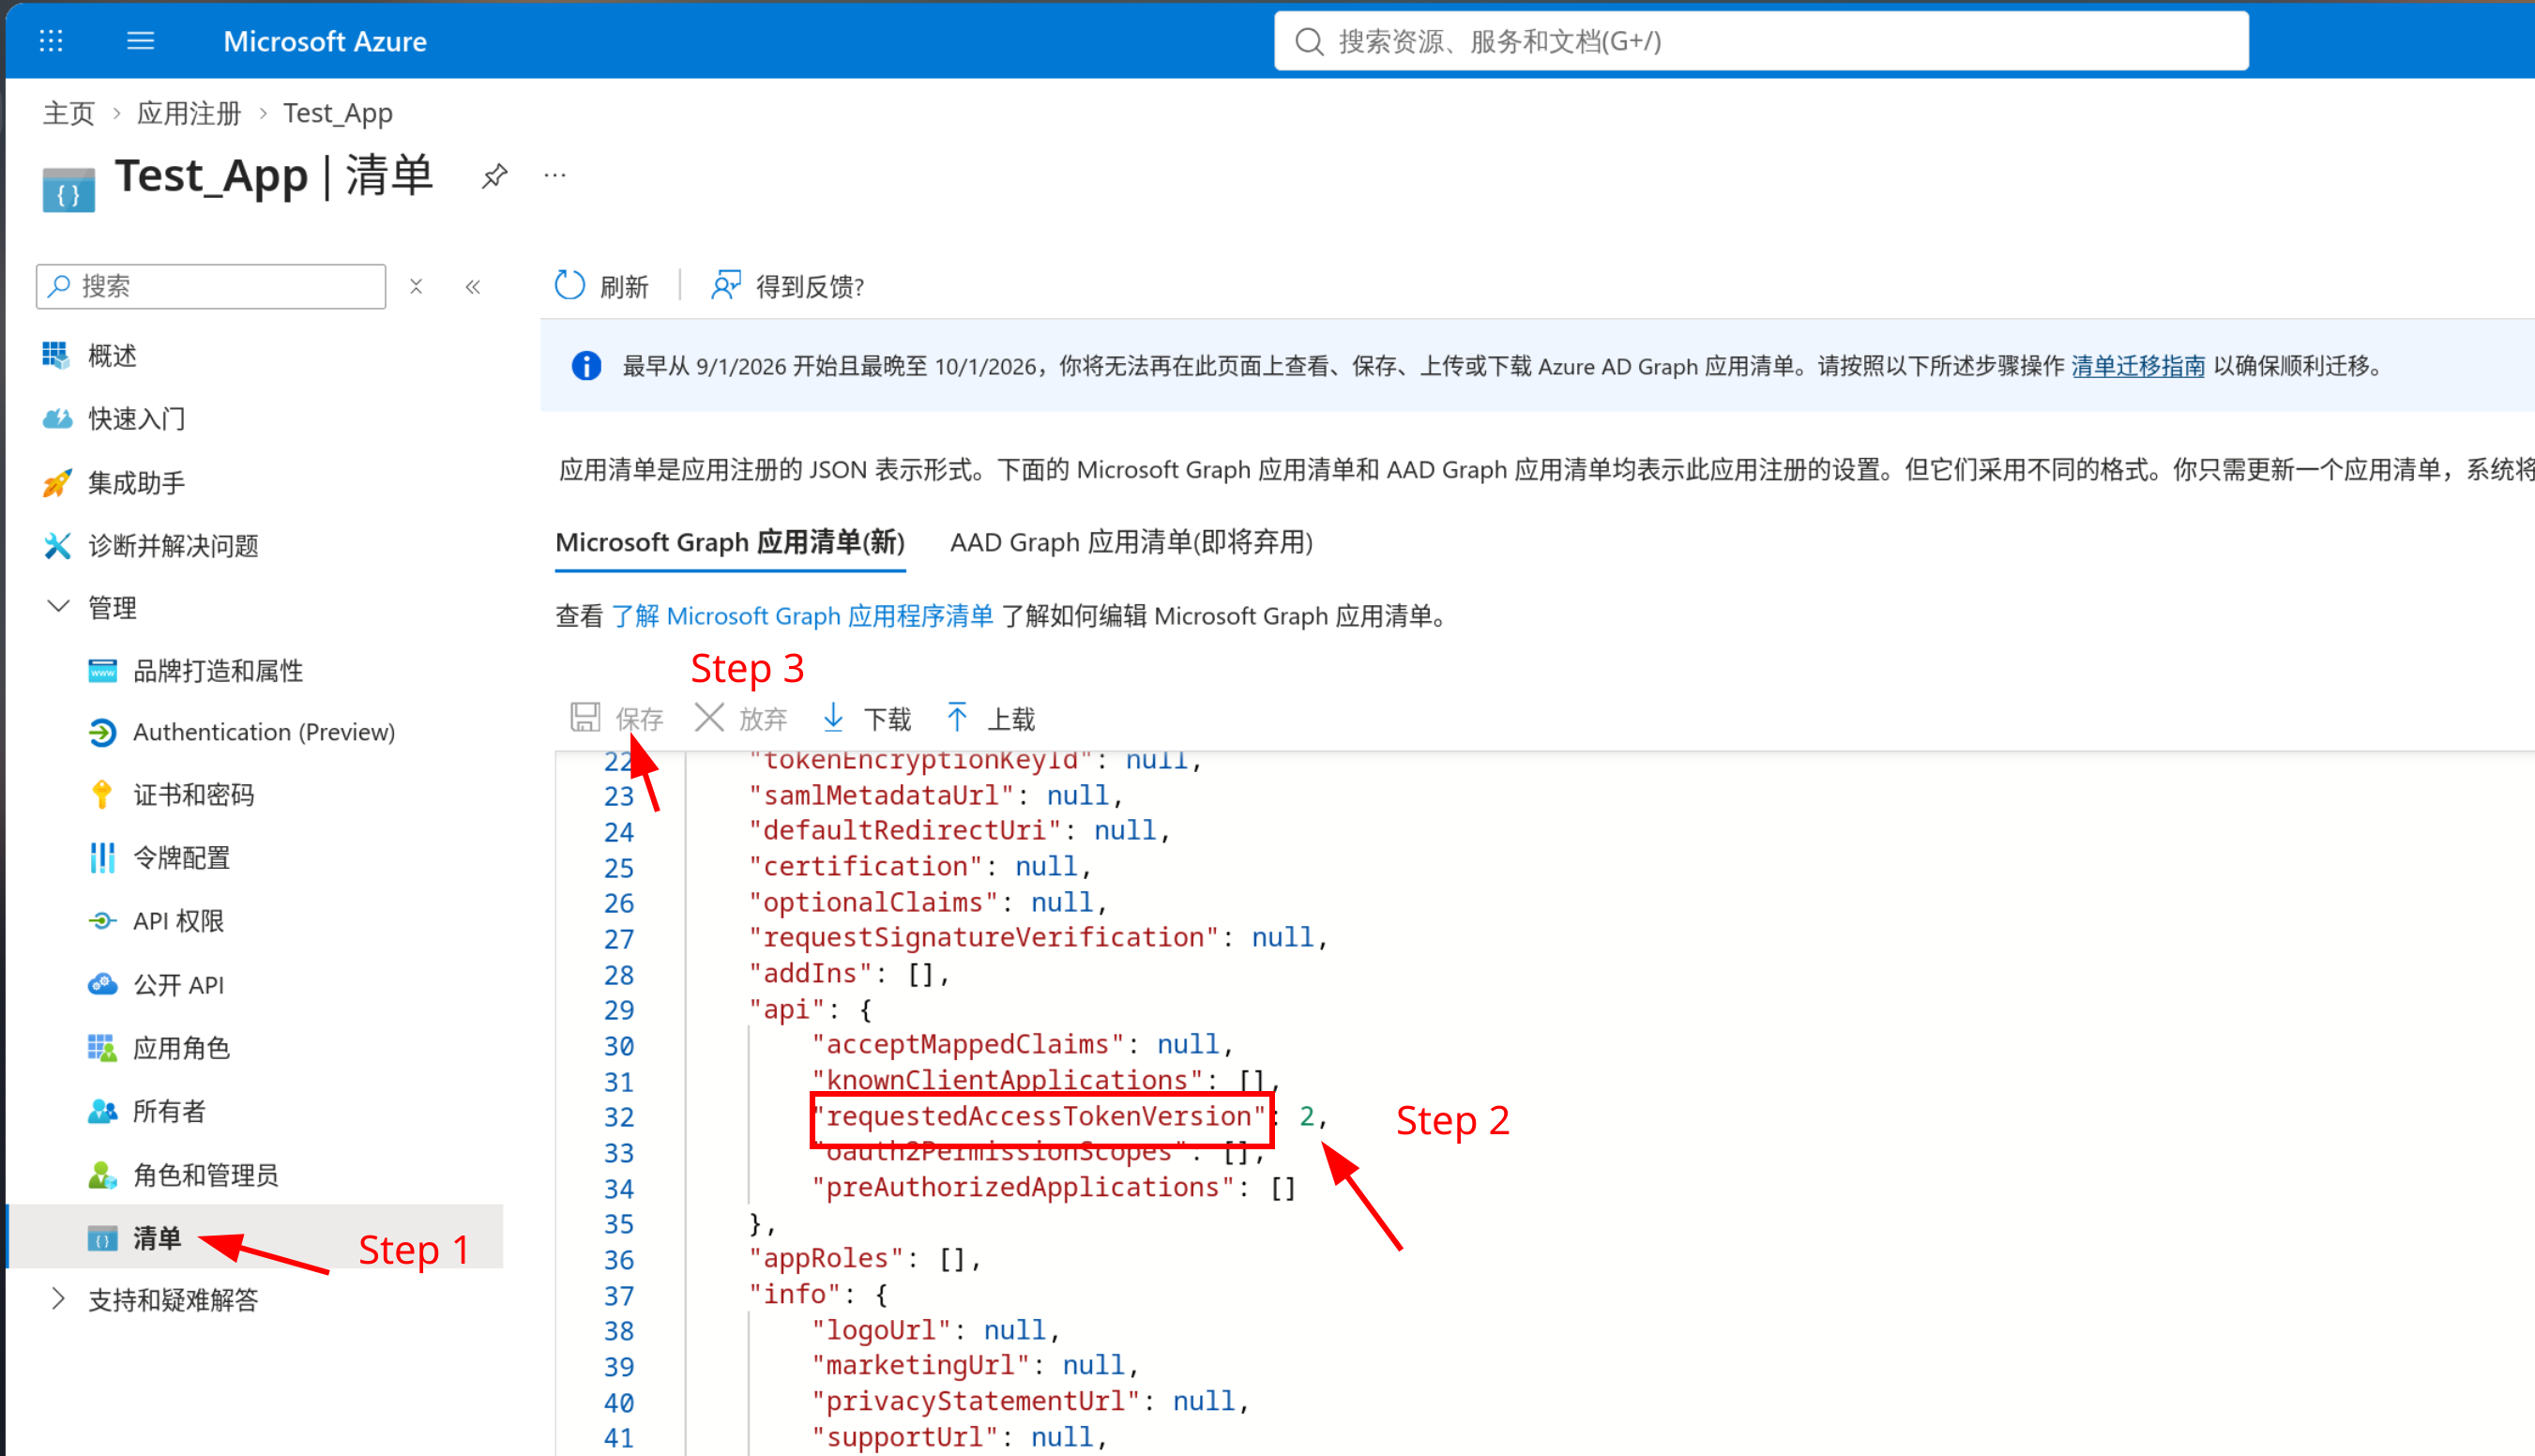
Azure edit app manifest
然后你就会发现,现在可以正常更改受支持的账户类型了

获取应用密码Client key

在左侧面板选择证书和密码,然后选中客户端密码,然后点击新客户端密码

可用时间按自己需要来,但是不要忘记到期前进行轮换哦
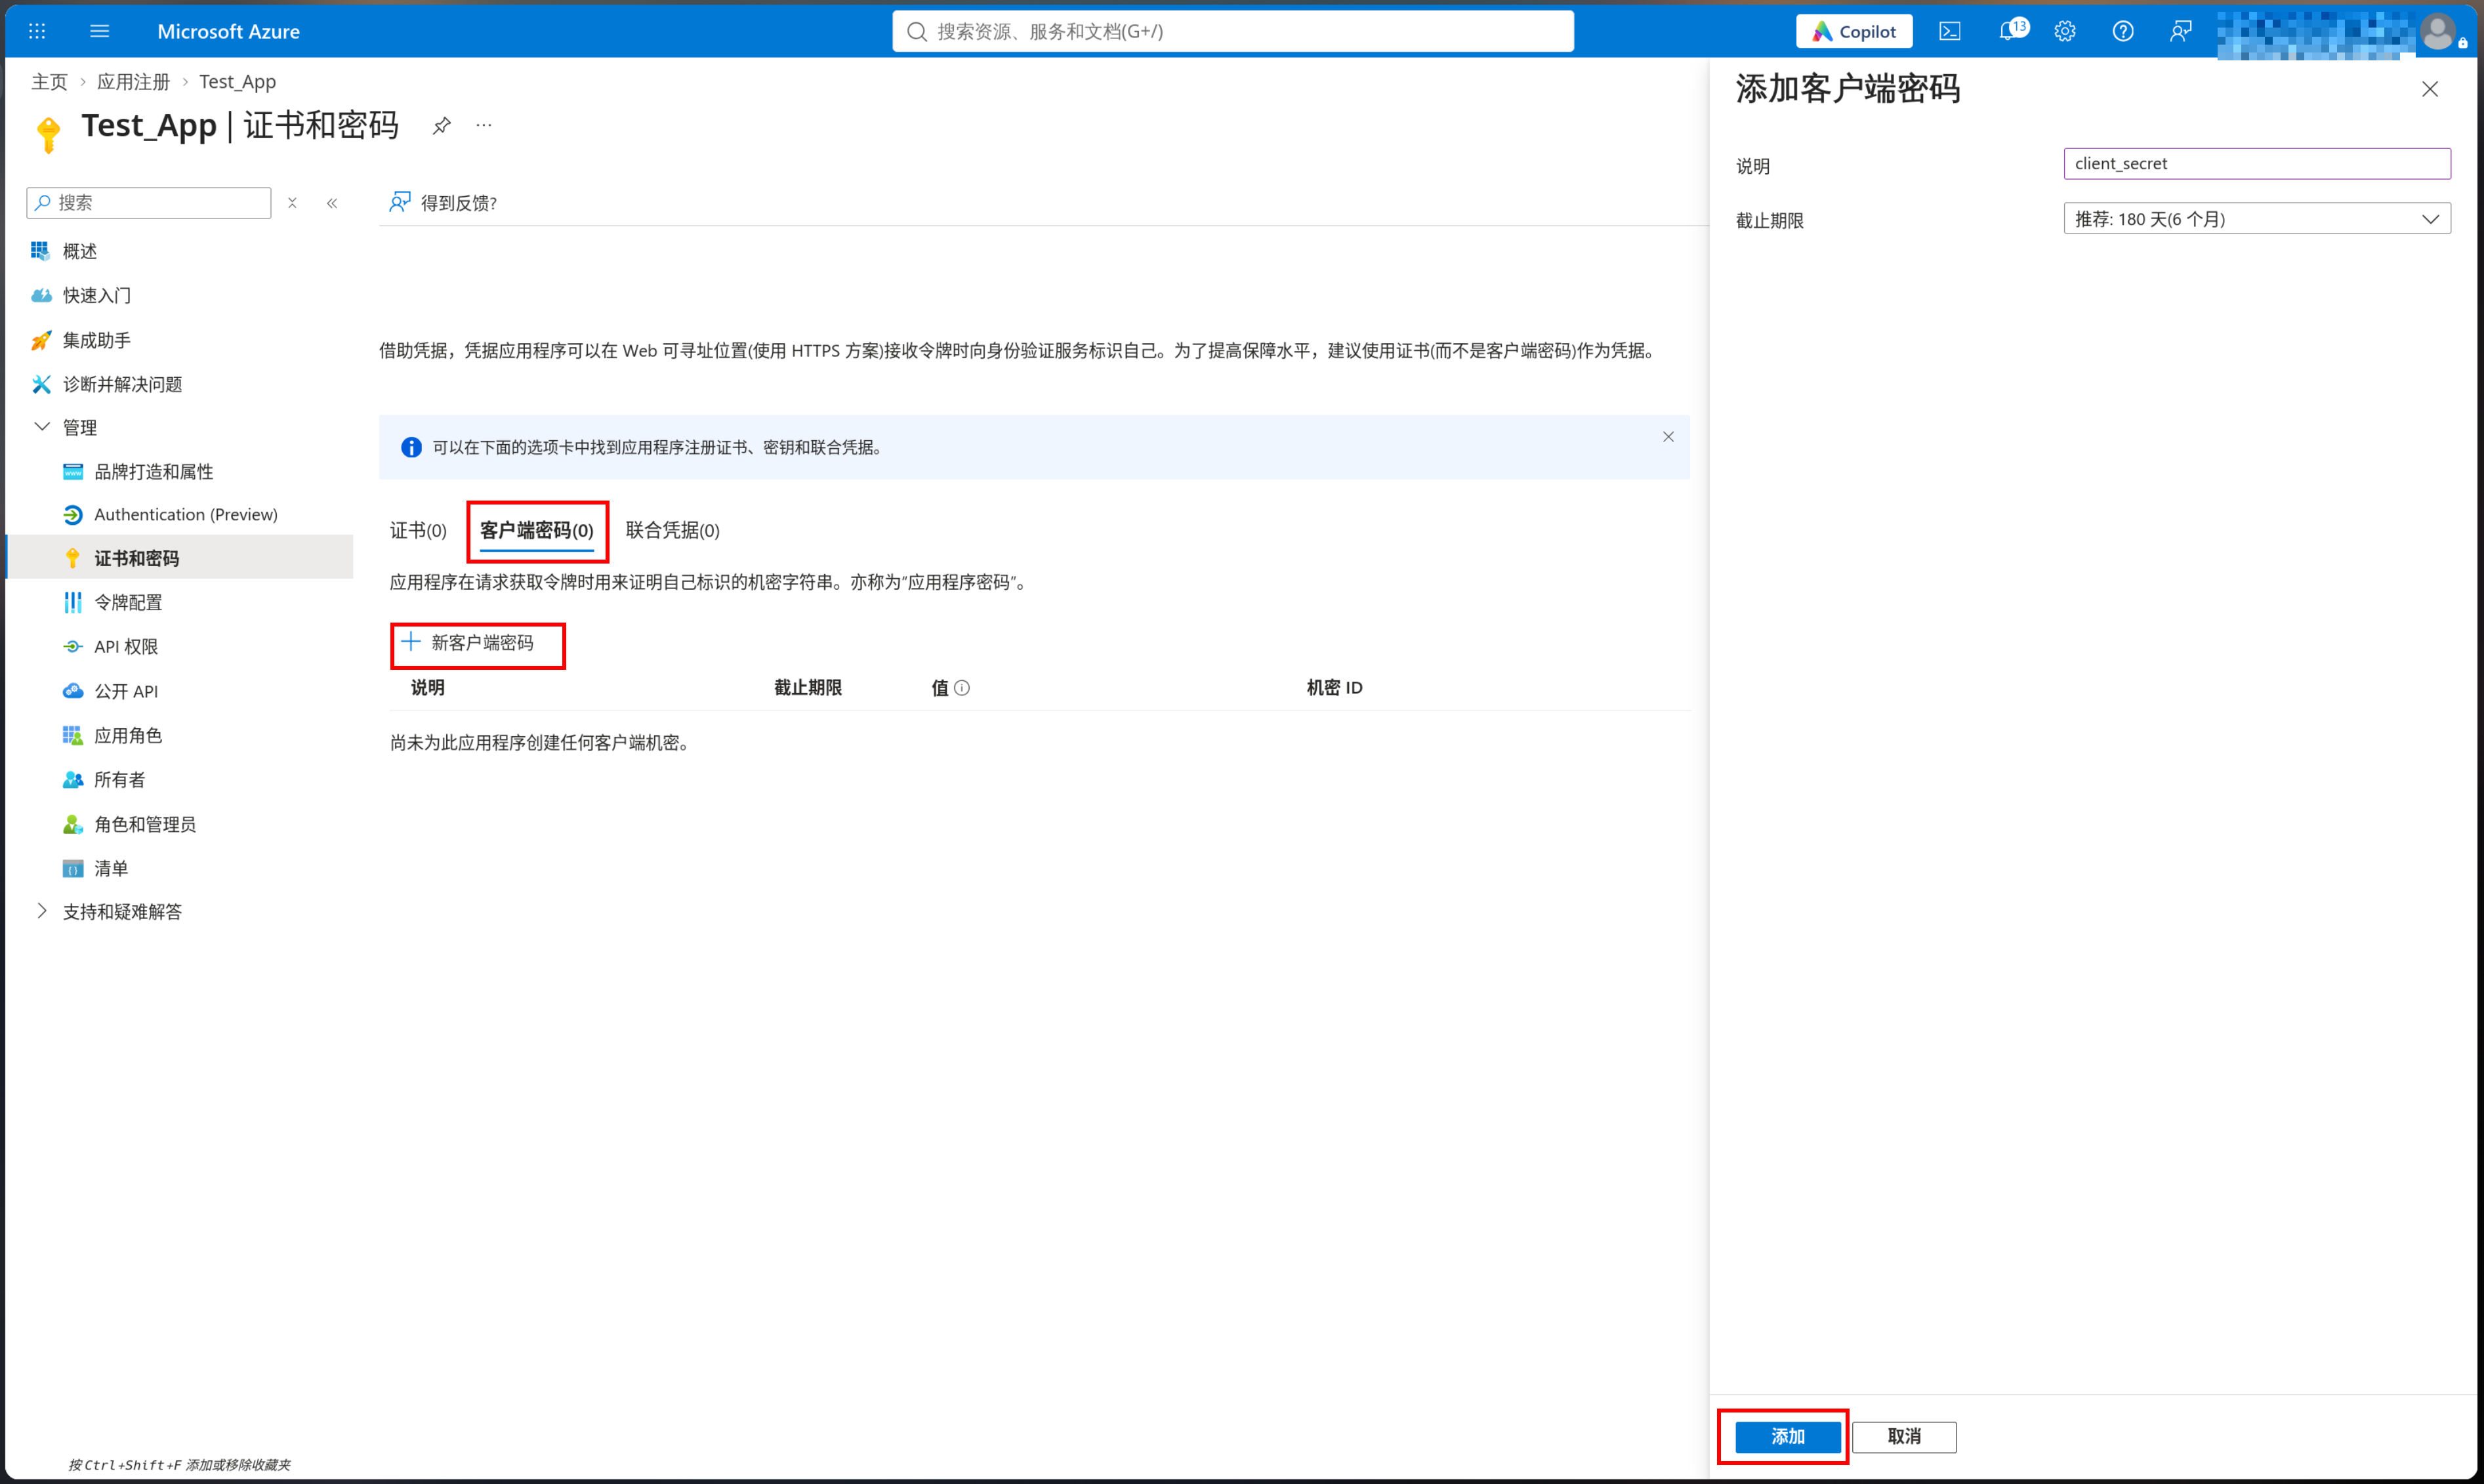
Azure app gen client secret

生成后请妥善保管值,也就是密钥。它只会显示一次

获取授权地址

这里以仅限个人账户为例进行演示

可以通过OIDC的配置端点获取端点地址https://login.microsoftonline.com/consumers/v2.0/.well-known/openid-configuration

授权登录的端点为https://login.microsoftonline.com/consumers/oauth2/v2.0/authorize

然后需要给授权地址加上如下参数:

  • client_id (客户端ID)
  • redirect_uri (重定向URI)
  • scope (权限范围,可以在API 权限一栏查找)
  • response_type=code (响应类型,这里恒为code)

组合好之后的地址应该像这样, 这里获取权限为profile email openid

1
https://login.microsoftonline.com/consumers/oauth2/v2.0/authorize?response_type=code&client_id=f629xxxx-xxxx-xxxx-xxxx-xxxxxxxxxxxx&redirect_uri=http://localhost:8080&scope=profile%20email%20openid

完成授权验证后,就会重定向到我们的http://localhost:8080并附带请求参数

处理重定向

这里先启动一个基础的python的http服务并监听8080端口

1
2
3
4
5
6
7
8
9
10
11
12
13
14
15
16
17
18
19
20
21
from http.server import HTTPServer, BaseHTTPRequestHandler
from urllib.parse import urlparse

class HTTPRequestHandler(BaseHTTPRequestHandler):
def do_GET(self):
self.send_response(200)
self.end_headers()
self.wfile.write("ok".encode("utf-8"))
print(f"=======Start got arguments=======")
for parsed_items in urlparse(self.path).query.split("&"):
key,value=None,None
parsed_items = parsed_items.split("=")
if len(parsed_items) == 2:
key,value = parsed_items
print(f"{key}={value}")
else:
print(f"{parsed_items[0]}")

if __name__ == '__main__':
httpd = HTTPServer(('0.0.0.0', 8080), HTTPRequestHandler)
httpd.serve_forever()
INFO

其实上面这个python代码不看也行,去重定向后的url里也能手动找到

保持其在后台运行,当重定向完成时,我们就获得了参数名为code的代码,用于下一步请求
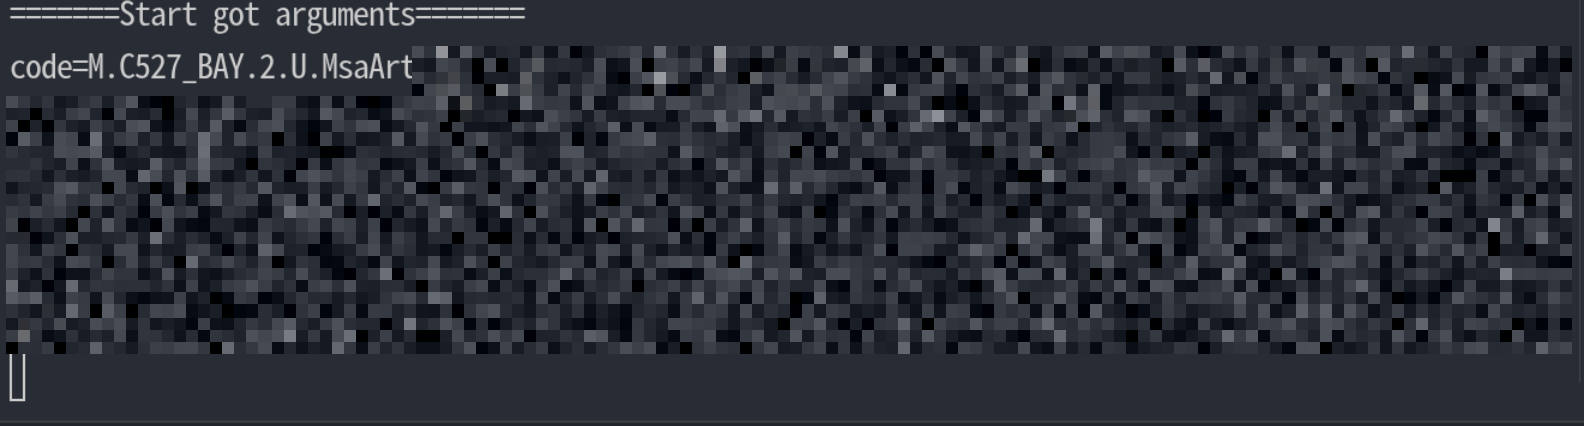
OAuth return code

获取访问Token

接下来拿着上一步获取到的code请求token,这一步就比较熟知了

请求方法为POST,以个人用户为例,请求端点为https://login.microsoftonline.com/consumers/oauth2/v2.0/token

这里需要在POST请求中包含如下请求体

1
2
3
4
5
6
7
{
"client_id": "f629xxxx-xxxx-xxxx-xxxx-xxxxxxxxxxxx", // 你的客户端ID
"client_secret": "24W8Qxxxxx.xxxxxxxxxxxxxxxxxxxxxxxxxxxxx", // 你的客户端密码
"code": "M.C527_SN1.2.xxxxxxxxxxxxxxxxxxxxxx", // 上一步获取的code
"redirect_uri": "http://localhost:8080", // 重定向uri
"grant_type": "authorization_code" // 恒为authorization_code
}

下面是python的演示代码

1
2
3
4
5
6
7
8
9
10
11
12
import requests, json

response = requests.post(
"https://login.microsoftonline.com/consumers/oauth2/v2.0/token",
data={
"client_id": "f629xxxx-xxxx-xxxx-xxxx-xxxxxxxxxxxx",
"client_secret": "24W8Qxxxxx.xxxxxxxxxxxxxxxxxxxxxxxxxxxxx",
"code": "M.C527_SN1.2.xxxxxxxxxxxxxxxxxxxxxx",
"redirect_uri": "http://localhost:8080",
"grant_type": "authorization_code"
})
print(json.dumps(response.json(), indent=4))

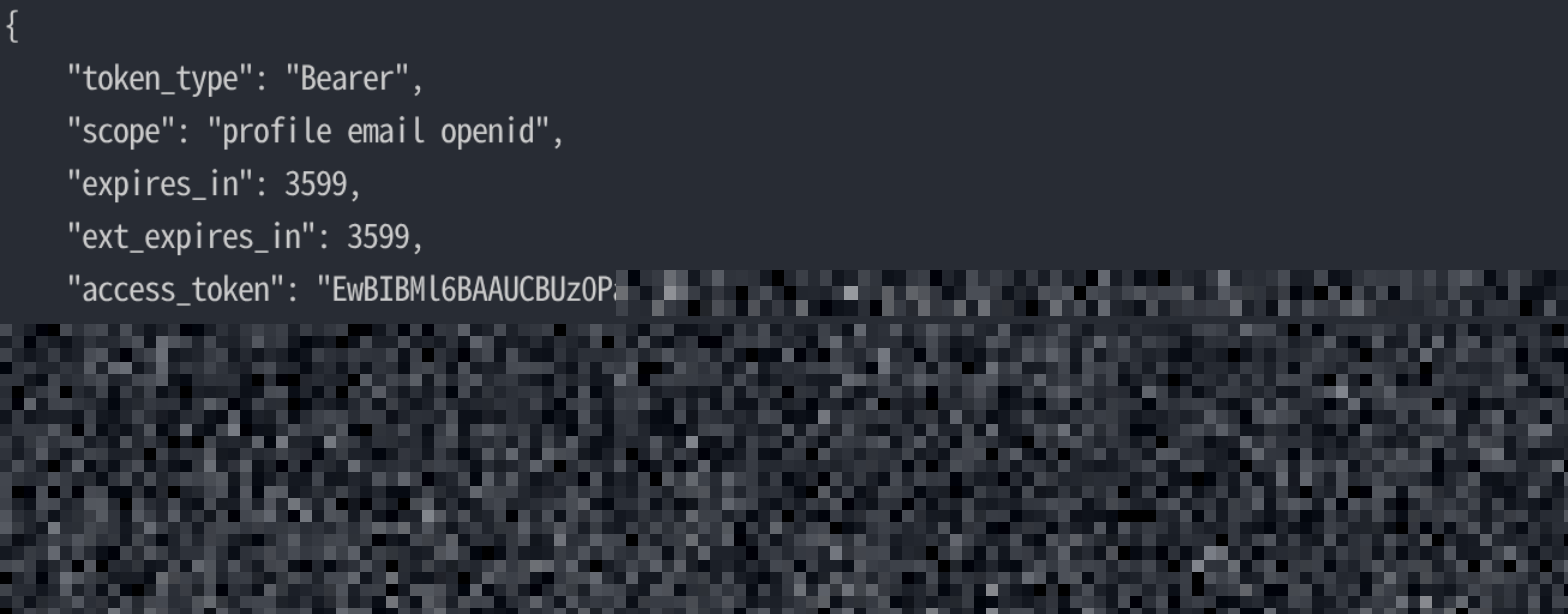
发送请求,在响应中就会得到如下格式的账户信息

1
2
3
4
5
6
7
8
{
"token_type": "Bearer",
"scope": "profile email openid",
"expires_in": 3599,
"ext_expires_in": 3599,
"access_token": "Token.xxxxxxxxxxxxxxxxxxxxxx",
"id_token": "xxxxxxxxxxxxxxxxxxxxxxx"
}

OAuth token return

请求账户信息

接下来,拿到token后就可以获取用户的账户信息了

这一步的请求方法为GET,请求端点为https://graph.microsoft.com/oidc/userinfo

这里需要在GET请求中包含如下请求体

1
2
3
{
"Authorization": "Bearer Token.xxxxxxxxxxxxxxxxxxxxxx"
}

下面是python的演示代码

1
2
3
4
5
6
7
8
import requests, json

response = requests.get(
"https://login.microsoftonline.com/consumers/oauth2/v2.0/token",
headers={
"Authorization": "Bearer Token.xxxxxxxxxxxxxxxxxxxxxx"
})
print(json.dumps(response.json(), indent=4))

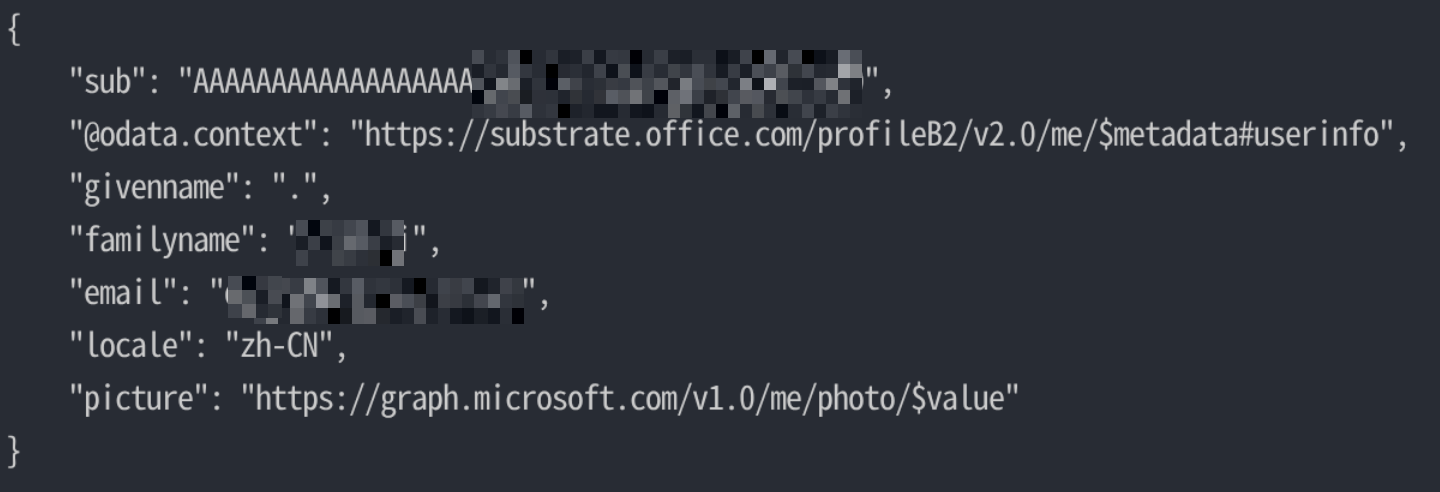
发送请求后,没有问题的话就可以正常获取到如下格式的账户信息了

1
2
3
4
5
6
7
8
9
{
"sub": "AAAAAAAAAAAAAAAAAAAAAPZxxxxxx-xxx_xxxxxxxxx", // 唯一标识
"@odata.context": "https://substrate.office.com/profileB2/v2.0/me/$metadata#userinfo",
"givenname": "xxx", // 名称
"familyname": "xxxxxx", // 姓氏
"email": "xxxxxxxx", // 邮箱
"locale": "zh-CN", // 位置区域
"picture": "https://graph.microsoft.com/v1.0/me/photo/$value"
}

OAuth get user info

其他信息

到这里就已经通过microsoft oauth获取到了用户信息。

如果对其他参数有有好奇,可以查看此处微软的文档下方的请求授权代码

我很可爱,请给我钱

其他文章
目录导航 置顶
  1. 1. 前言
  2. 2. 准备工作
  3. 3. 注册应用
    1. 3.1. 选择了错误的账户类型
  4. 4. 获取应用密码Client key
  5. 5. 获取授权地址
  6. 6. 处理重定向
  7. 7. 获取访问Token
  8. 8. 请求账户信息
  9. 9. 其他信息
请输入关键词进行搜索